

Well, so you've decided to make an own cutscene, did you? And I mean a DF cutscene. Well, whadda hell, DF may be clinically dead, but I feel it would be a little unfair to close this chapter without even having revealed some experience I gained during editing DF.
In JK, you actually can make any kind of cutscenes with the Smacker tool available e.g. on www.radgametools.com or www.darkjedi.com The quality of the cutscenes in JK will depend on one's skills in rendering 3D stuff. In a way, I even will miss the DF's Landru engine, for it'll not be that easy to make even such a stuff like an own textcrawl or replace some music/sound, or extract some component you'd like to use...
Well, this tutorial's purpose is actually not to instruct you what you have to do step-by-step but to give you an overview over the Landru cutscene commands explained on a simple example, and some working tips. I hope there will be some interest at least....
First thing we need is some idea for a cutscene. Imagination is the the engine of the creation. So, if you have created a level with a plot worthy of a cutscene, or discovered such a level which hasn't any, and have an idea for a cutscene, the first step is already done.
Further, I recommend you the following software:
Well, so far the software. Now we come to the cutscene planing. We have to draw a little kind of a storyboard with cuts and maybe time durations. Just like in normal movies. What that storyboard should contain is for example:
Now about the Landru techniques. The cutscene components are stored in the Containers with LFD extension. They are used for example in the games X-Wing, TIE Fighter and DF, of course. LFDs not only contain cutscenes but also resources needed for the game itself, like the different DF menus, dialogues, fonts etc.
LFDs contain Resources. If you take a look at a LFD with a viewer, you can see that a resource has an ID (first 4 characters) and a Name (the next 8 characters). The ID is similar to DOS extensions and signifies a resource's type. The IDs used in DF are e.g. FILM(film script), DELT(picture), ANIM(animation), PLT(palette), VOIC(VOC file), FONT (Font for agent menu & error messages). X-Wing & TIE Fighter use some more like PANL (panel), SHIP (ship model) or TEXT (text), GMID(MIDI music). Notice: Dark Forces has no GMID resources!
The programs which extract such resources, mostly cut one letter out, like FILM->FLM, ANIM->ANM, DELT->DLT, VOIC->VOC, PLTT->PLT. This extensions are conventions of programs like BMPDF. For the comfort, I gonna use these extensions in the further article. Further convention for this article: If I use a WHITE FIXED font, that means I am describing a listing or a keyword. If I use red text in a box, that means that this is a syntax description or an important notice.
Each good level should have one. :-) No, earnestly, a textcrawl belongs to a level like a briefing and helps you scoring for some level awards. And the best is--- everyone can do one.
First to the Textcrawl's text style: it is highly recommended you use the language that Lucasfilm/LucasArts adores to use- formal and somehow old-style. The contents is dependant on your level's subject, but try to make the text really enchanting and intriguing. Examples: "little does Luke (here of course Kyle) know..." or "When this ultimate weapon is completed, it will spell certain doom on the Rebellion..." Such thingies are always good.:-)
Now to the practical side. The textcrawl is stored in the file FTEXTCRA.LFD. If you extract this file's contents into a temporary directory, you will get some files:
|
|
|
| STARBC1X.DLT | The Stars backround for the scene |
| TEXTCRAW.DLT | Crawling Text - that's what we need! |
| FTEXTCRA.FLM | The film script controlling the action |
| 1EPLAN.PLT | Transit palette for 1E.LFD |
| TCRWPAL.PLT | Crawling Text palette |
Now, how do we replace the textcrawl. That's pretty easy, though. What we
need is just to convert TEXTCRAW.DLT to a normal picture format, delete the
unneeded stuff and re-convert it to DELT. With BMPDF, you can convert it with
the command
DF2 textcraw.dlt tcrwpal.plt /X
You of course also can use WDFUSE's converter tool. But it only
generates BMPs, that's why I dislike it.
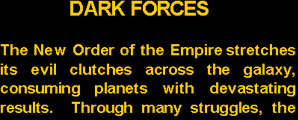
But back to the editing. The picture extents must stay the same(298x440), or you will get some strange effects like disappearing edges of the text or too fast crawling. Now what we got is a picture with the entire crawling text (here the extract). You should save the palette of this text in PSP by "Colors->Save Palette"
 |
Please notice that the crawling text has the following basic properties:
|
So, if you want to edit that text, you should hold to these settings. For such a large text, I would recommend a program with a textbox option like LView Pro or MS Paint (this one does not support Block formatting though). I always used MS Paint to do that, for despite of its flaws, it is the only one with WYSIWYG feature. The block effect I reached by filling the lines out with spaces. The text color you can pick up with the dropper. The font size is Arial Bold, 13pt for the heading. For normal text it is Arial Bold, 12pt.
Now, if you did the text alright, check it against for right spelling and eventual errors, before we finally smooth it up. Here's how to do it in Paintshop Pro.
Now what we have to do is to save & convert the changed TextCrawl we have created. To do it with BMPDF, type in
2DF textcraw.pcx /D
Notice- I
extra let out the palette file and made YOU do the work of remapping palettes
with PSP. The reason is that: If you specify a palette, BMPDF will not only
remap the colors, but also cut away the areas which are not filled
(transparent). In normal cutscenes it is useful, in textcrawls it will look
horrible. So we convert the image w/o converting palettes, 1 to 1.
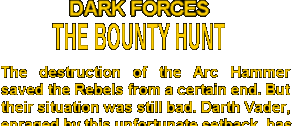
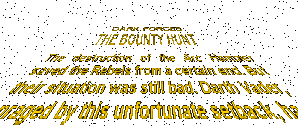
Here's the edited textcrawl from my level "The Bounty Hunt", once as image and once "in action":
 |
 |
Well, now what you have to do is to recompile the LFD back either by the makefile for BMPDF or with ConMan or with WDFUSE as well. BTW a good place for such a textcrawl is the LFD with the briefing. You just add the 5 files to your own DFBRIEF.LFD and change the CUTSCENE.LST line in order to point to DFBRIEF.LFD instead of FTEXTCRA.LFD.
Well, in this section I will explain how the cutscene film works. I will explain it on a typical example of a scene "arriving to a planet", for this is most useful and also most easy.
|
Well, let us suppose you have a level setting on some planet so you need an effectful arrival to the planet. No matter how it looks like, it is almost the same procedure each time. You mostly need a stars background, a planet picture and an animated Crow sequence. As I do not suppose you to render one (you can though), there is actually little choice which Crow animation is to be used. See, the most DF-internal cutscenes are made with one single full motion ANIM, including Crow, planets, other ships, asteroids and so on (see Gromas or Robotics cutscene). And I cannot ask from you to accurately delete everything except the Crow--- you'd have to do it in all the frames of an animation plus retouch the edges etc. There are actually only 2 good Crow flights worthy to use (I did it multiple times): the Crow flight to Danuta base in 1E.LFD (after textcrawl) and the Flying By Crow from before Talay ("Kyle delivers the plans...") which is actually equal to the last flyby scene (after being awarded)...So let's use the 1E crow as flying to a target planet. |
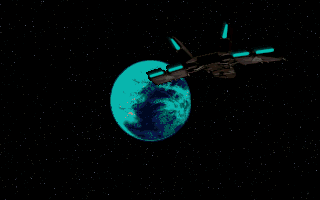
The ready cutscene. Download it! |
Well, now you should think how such a flight looks. The most easy way is to display the planet directly after the start in the middle of the screen and let Crow fly to it. It can be enough, though less spectacular. There is a better way: to PAN to a planet until it is in the right position, and then let the Crow fly to it (like in 1E). Like, the scene begins with a clear stars bg, then the camera moves sidewards(or what direction you like) until the planet comes in; when the planet is in the middle, it stops and then the Crow flies to it.
Notice: the pan speed of the planet compared to the
speed of the background stars is dependent on how far the planet is. Hereby the
following rule is valid:
|
Now we get to know what the FILM script is about. The FILM script is a kind of a project file which determines the components' behavior at the time. It is in binary format. But thanks to Carl Kenner who was keen enough to hack it, we now have a complete description of the FILM commands and syntax.
You can have the complete FILM syntax reference if you download BMPDF (I guess, there are few who don't have it yet), in the file FILM.TXT. DF_SPECS also have a copy of this description. In the following, I use Carl's description, for it has been adapted by both BMPDF and WDFUSE. As I use BMPDF for my causes, I will only once point out differences between BMPDF & WDFUSE, then I will use the BMPDF syntax.
The FILM script contains multiple objects which then contain a kind of a timetable of the object. At certain times, the object's properties can be changed, e.g. its moving speed can be changed, it can be turned on/off, moved around, put on some layer, animated, played, mapped (dependent on the object type). Each resource can be used multiple types, i.e. you can use one stars background DELT many times (timely synchronized on different locations) so that your stars bg can be panned in different directions without a "sliding away" effect. You also probably have seen how such technique has been used in TIE Fighter Diskette version: there are 3 Star Destroyers flying. In reality, only one ISD resource is in the LFD (more exactly: one left half). Then, in the FILM, this resource is shown 6 times, (3x2 half Star Destroyers with one half flipped), whereby the side ISDs are made to fly sidewards by the combination of speed directions and moving to certain places).
Objects begin with an object type, followed by object name. Then the object contains a timetable (with different times signified by *TIME*(in WDFUSE - TIME) keyword). Each *TIME* is followed by a various number of commands. The object is ended by END. The whole film is ended by the END (WDFUSE: END0) object which also carries the name "Untitled". In BMPDF film scripts, the objects are preceeded by ">", in WDFUSE they are formatted otherwise.
The film starts with a complete duration of the scene. That means, how long will the scene run until it changes to the next one. All the following *TIME* timetable must, of course, lie under the complete time. In BMPDF it is determined by first keyword "TIME", in WDFUSE by "DURATION". The framerate of the cutscene (at speed=10 in CUTSCENE.LST) is 10 fps, i.e. you can execute commands every 0.1 sec (one frame).
Each film needs a necessary component- a VIEW object. This object must be
on first place and contains the CUT information. (CUT is the keyword to make a
kind of a translation between scenes- fade, over black, left to right, without
visible cut etc...). Its name is usually "Untitled". I do not see any
reason to change it. Then, there are optional CUST (called "custom")
objects which contain the CUE keywords. (CUE is the keyword associated with the
CUEs in CUTMUSE.TXT and is responsible for cutscene music). These objects are
not linked to any files like the rest.
Then there are objects which have a
resource extension as type. That means, ANIM, DELT, VOIC or PLTT. The name of
the object is its resource name. If you specify a resource name which is NOT
contained in the LFD (except for VOIC objects which are also searched in
JEDISFX.LFD), Dark Forces will kick your LFD at the start with message "Unable
to load all the items in cutscene X".
So, now we think of an idea of a cutscene. Let us suppose, the done project should look the following. The at the beginning, you only see static stars. After 1 second, the camera begins moving to the right and a planet comes into the picture. The camera pans until the planet is in the middle, then it stops, and the Crow flies towards the planet (the 1E Crow).
What we also need here is:
First thing: you have to make the needed graphics components. Let us say, we
take just the 1EPLAN.PLT from 1E scene (this is easier for the beginning, for no
palette conversion is needed). Other pluses: you can take the Crow (1KSHIP.ANM)
animation and the stars background(STARSBC1X.DLT) directly from 1E.LFD. Create a
directory for the cutscene. Extract the components from this cutscene and copy
them into this directory.
| Now we do need a planet picture. If you are a good artist, you can draw one; you can also render one; or you can scan a photo. You also can try extracting some planets from X-Wing or TIE Fighter game, or XvT, or some other, or get a graphic from the Internet. Anyways, let us suppose that you have a planet picture. What you now have to do is to resize it to the proper size. Then paint all the transparent areas with color 0. Then, you have to convert it to 256 colors. Save it as a PCX file or an uncompressed BMP file. Let's say PLAN.PCX (this one I took from X-Wing- there it was used for both Alderaan and Yavin IV). So it looks after conversion to 1EPLAN.PLT. |
 Notice: I converted the palette with PSP, for BMPDF put in purple colors after conversion. PSP used grey colors. I manually filled them with the brightest cyan color in the palette. |
Now what you have to do is to convert this planet to DELT. For this, run
2DF /D PLAN.PCX 1EPLAN.PLT
By doing that, you get a PLAN.DLT with remapped palette (as far as possible). If you have selected unhappy colors for the planet (the ones not available in this palette), your planet will mostly be grey or in other bad colors. If you are not comfortable with some colors, you can decompile the DELT to PCX or BMP again (with the needed palette), edit it, and re-compile back.
Now we need to make the FILM editing. First, we create a makefile for BMPDF. It can have any name, but it's reasonable to call it by the name you gonna give to your FILM resource. So let us call it "PLAN.TXT". Then we edit the file and put a first line into it:
| FILM plan.flm | This is a direction for BMPDF for the FILM output. |
Let us now embed the future film-to-be into your level. Therefore, extract
the file CUTSCENE.LST into your directory. There, you have to insert or replace
a line containing your cutscene. Like, we paste:
...
#
SECBASE -- 100
100: arrival.lfd plan 10 0 0 0 110
Here we suppose our LFD will have the name ARRIVAL.LFD, the film resource is PLAN (PLAN.FLM); the cutscene is played with speed 10, there is no next cutscene, and no SkipTo cutscene, the MIDI sequence played is 0 and the MIDI volume is 110%.
Now, we think of a time for our film to run. Let's say, 1 second for fading in, further 11 seconds for stars to scroll and the planet to come to its position, yet 2 seconds before the Crow flies (42 frames, that means 4.2 seconds flight time), then, after the Crow has flied away, yet 3.8 seconds- a total of 22 seconds (please note that I already made the scene and calculate with the values I took). It is however completely your decision how long a scene takes. But in our case, it is 22 seconds, so let's define it, after the filename above.
TIME 22.0
Now we need the first object which must be the VIEW one.
|
>VIEW untitled |
This is the object definition |
| Reference: The CUT command is used to cut between different scenes or "subscenes" where different settings are changed during one FILM. |
| The first parameter is the way how to cut: CLEAR, DIRTY -they both clear the screen for a split second SWAP -changes the screen without cleaning FadeRight, FadeLeft, FadeUp, FadeDown- clear the screen from the corresponding side. FadeUpDown - clears the screen from both up & down FadeToBlack -should fade to black Stop - = 23 used above. Makes an actual soft fade in from black. |
The second parameter is the type of the
cut: NEW - used for scene beginning (from black) OLD - used for updating the scene (in the middle) END - used in the end of the scene. |
Notice! The *TIME* command argument should be a real number (like 22.0) to be interpreted rightly as 22 seconds. If you write just 22, it will be interpreted as 2.2 seconds (22 frames)!
Now our sorrow is to set the palette. As you know, we use 1EPLAN.PLT. We have to add now a PLTT object to our script:
>PLTT 1eplan
*TIME* Start
PALETTE 0
END
We set the palette by command PALETTE 0. You can define multiple palette objects and set them during one scene.
Now we get to the interesting part: the DELT handling. This means in this case, the background. At the BG, we have stars and one planet which is invisible at start. So we now create a new object called DELT:
| >DELT starbc1x *TIME* Start LAYER 100 SWITCH On *TIME* 1.0 SPEED -3 0 0 0 *TIME* 12.0 SPEED 0 0 0 0 *TIME* 21.9 Switch Off END |
Name of the object Starting time Put to background (100=bg, 1=fg). Turn the picture on At time=1 second... Constant speed is 3 to left (3 pixels per 0.1 sec) At time = 12 seconds... No speed again. One frame before the end... Turn off (required or it won't be unloaded) End object |
Now if we do so, only one stars picture will move (320x200). And it will
seem to slide to the left. To help this out, we dublicate this object and paste
it twice again. Into the first object copy, we add a line at *TIME* Start:
MOVE
320 0 0 0 That means that the picture is initially moved 320
pixels to the right. Into the second copy, we put - now guess -
MOVE 640 0 0 0.
| The coordinate system of the screen is directed
RIGHT and DOWN. That means, if you specify absolute or relative coordinates, the
positive values mean translation to right/down. The first coordinate is X, the
second Y. The pictures are put to the specified coordinates by the upper left
corner. So, to move a picture to 70 pixels from the left screen side and 60
pixels from the upper screen side, use MOVE 70 60 0
0. Negative values put it outside of the screen (useful when you
want to hide something to be revealed later by scrolling). Same applies to
SPEED: positive X values move things to the right, negative to the left;
positive Y values move it down, negative up. You also may combine X & Y
speeds, like SPEED -1 -1 0 0 Notice: the 2 last coordinates at SPEED and MOVE are not used and are equal 0. They are needed however! |
Now that we have our background, we have to use the planet. As we told, first, the planet is unseen, but once the camera pans to the right, it comes into the picture. Let us say, it stops (at time 12.0, remember?) at the position x=110. The planet is 81x82, so 110 is pretty close to the center. The vertical coordinate does not change. The screen height is 200, the middle is 100, minus half of the planet's height is 59. Let's say, it's 60.
Because of the similarity to the stars' background movement (it's small so
it moves with the stars), we just copy the stars' object code (replacing >DELT
starsbc1x by >DELT plan), however complete it with the following statements
at the *TIME* Start:
LAYER 99
MOVE 440 60 0
0
By that, we put it on a level BEFORE the stars, and move it pretty much to the right, so after 110 frames * -3 pixel per frame we get to X=110.
Well, pretty easy isn't it? Now we gonna put the Crow animation into the scene. The Animation is nothing other than a collection of DELTs. Therefore you are able to use the same commands on the Animation (MOVE, SPEED and others). There are also 2 more commands: ANIMATE and FRAME.
| ANIMATE how 0 tells to
animate an ANIM in a way specified by "how". At start, the ANIM is not
animated. There are 3 "how" values: Forwards - animates the ANIM forwards. Example: ANIMATE Forwards 0 Off - turns the animation off (single frame freezed). Example: ANIMATE Off 0 Backwards - animates the ANIM backwards. Example: ANIMATE Backwards 0 You may NOT let the ANIM play over the available number of frames in it. If it reaches over the end, the ANIM is still played, but gets uncontrollable. |
| FRAME n 0 tells to display a single frame n of an animation. The first frame is 0, the last is NumFrames - 1. If you specify a frame not in your ANIM (like, too high a number), you'll get an error message " XACTOR.C: Value out of bounds. ". Example: Frame 1 0 |
Now we've cleared the theory, now on to the practice. We decided to start our Crow flight at the time 14 seconds. The Crow ANIM contains 42 frames, so it'll last 4.2 seconds. We create an object called >ANIM 1kship:
| >ANIM 1kship *TIME* Start LAYER 15 *TIME* 14.0 SWITCH On ANIMATE Forwards 0 *TIME* 18.2 SWITCH Off END |
Object name At start- Put into fg At time=14 sec- -Turn ANIM on and Animate fwds. One frame after last frame- -Turn it off. End object |
Well, the animation is in a way complete.
Well, now we miss the sound which Crow causes when it flies by. The VOIC objects are first searched in your LFD, then in JEDISFX.LFD. As we now are using a JEDISFX one, we don't need an extra VOC. However, we should know which one it is. And it is in this case SH-NF-1.VOC.
| There are 2 ways of playing sounds in a cutscene:
the SOUND command and the STEREO command. SOUND OnOff Volume 0 0 The OnOff means if to turn a sound on or off. The volume (either a percent number or simply a number) signifies the playback volume. Example: SOUND 1 100% 0 0 STEREO OnOff Volume 0 0 Pan 0 0 OnOff and Volume are the same as at SOUND command. Pan is a number from 0 to 127, whereby 0 signifies left and 127 right. 64 is middle (notice: Carl Kenner's text says 0-255 but that's not correct). Notice on loopable sounds. Avoid playing them. Once you do, they are played until the scene ends and I couldn't find a way to turn them off. Only if you have a whole cutscene e.g. on an ISD, you can successfully use it. |
Well, now we add a VOIC component:
| >VOIC sh-nf-1 *TIME* 13.6 STEREO On 100% 0 0 64 0 0 END |
Voice object 4 frames before the anim starts play at 100% volume, middle. END |
Notice: I could have used SOUND instead, but I did not.
Well, now we almost have a complete cutscene. Almost. Because a scene is only 99% effective without a good bg music. The only problem is- it is no Landru command, but used externally thru the files CUTMUSE.TXT and CUTSCENE.LST.
The Cutscene.txt specifies the sequence to play, the CUTMUSE.LST defines certain CUEs (changing tracks, fading out and so on). I however never was brave enough to edit it. To use external music, I always patch simple 1-cue melodies like ROBOT1 & 2.GMD and GROMAS1 & 2.GMD. Here, I demonstrate what we have to do to use the music from before the Arc Hammer level.
First, we take a look at CUTSCENE.LST. If you did not yet add a line for your cutscene, do it (see above). The value before last, labeled <cutmuse.txt SEQ # (midi)> is the signifier which music to use. Take a look which seq # the scene before ArcHammer uses, and put it into your scene line. Here it is 10.
Now you go editing our FILM text file again. Add the following object:
| >CUST custom *TIME* Start CUE 1 *TIME* 0.1 CUE 0 END |
Custom object is used for MIDI playing At beginning, Play 1st CUE (as described in CUTMUSE.TXT) At time 0.1, Play forth END |
This should be enough to play most MIDIs. To be able to make complicated track jumps, fade-outs, etc. you best take a look at the original DF cutscenes (compare the scene times and the CUEs called). That's how I did my BH cutscenes music sound so good. :-)
Example: this very Sequence 10 (Cargo ship) contains 2 CUEs in the Cutmuse.txt. If you take a look at the original DF cutscenes (CARGO1 & CARGO3.LFD), you see that the last one makes use of CUE 2 near the end. This one signifies (only in this special MIDI, of course!) the fading out of the music. So if we want to add this to our scene, we use instead of the old Custom object a new one:
| >CUST custom *TIME* Start CUE 1 *TIME* 21.0 CUE 2 *TIME* 21.1 CUE 0 END |
Custom object is used for MIDI playing At the beginning, Play 1st CUE (as described in CUTMUSE.TXT) At time 20.0, Fade out (only this GMD!) At time 20.1, Play forth END |
| Attention: When playing multiple CUEs after one
another in the CUST object, do not make any jumps (like from CUE 3 to CUE 6 or
beginning from CUE 5. You actually have to skip thru all the rest CUEs, though
it may happen at the same time). Like, *TIME* Start CUE 1 CUE 2 CUE 3 CUE 4 *TIME* 0.1 CUE 5 |
Now we actually have the whole cutscene. Compile it with 2DF; then
compile all the required files into an LFD of your choice; put a connection to
it into your CUTSCENE.LST (if not done yet), and play.
Here's the complete
listing of the FILM script for BMPDF: PLAN.TXT
Here are the tips from me (who may count himself an expert) about how to make cutscenes PROFESSIONALLY.
| A notice on the command "???? x y". The command "???? x y" is used in X-Wing and TIE Fighter to flip DELTs and ANIMs. There, if you set the x to 1, the DELT/ANIM was flipped horizontally, if you set y to 1, it was flipped vertically. In Dark Forces, vertical flipping does not work, which can disturb the conversion of X-Wing or TIE Fighter cutscenes to Dark Forces. Further, the Mac version of Dark Forces does not support the X-flipping either. That is a reason enough to be more than careful with this command. |
I wish you a creative phase and a lot of success for your cutscene project!