
This article discusses how to create realistic outdoor architecture, and hopefully how to do so without sacrificing framerate.
First of all, it is important to understand negative space. I was reading over an Unreal editing tutorial, and it explained the concept in a new way, so I will share it with you.
First off, you start with a huge block of clay. Your level will be created INSIDE this block of clay. So, you "scoop out" pieces, leaving the open area inside. This open area is where players can have their fun. In Jedi Knight, the method for scooping out is in sectors. You just insert a sector, which is the scoop out. Say you cut that sector into smaller sectors, then take one of them, and delete it. This deletion of a sector allows the clay to fill in where the sector had been, thus creating "solid" architecture, from the players point of view. From the editors point of view, there's no sector there.
Anyway, for a quick introduction, read The Massassi Temple's tutorials on Outdoor Buildings Part 1, and Outdoor Buildings Part 2. This article is based on the assumption that you know how to create a simple outdoor building.
First off, what is "outdoor architecture?" When I talk about it, I mean things like cliffs, rivers, rocks, gorges, canyons, mountains, and trails. Read over that list again... what is it that they all have in common? Each of these things, in nature, appears very random and comlex. It is this problem exactly that we as editors must solve. The Jedi Knight engine, and 3d game engines in general, don't handle "random and complex" very well. So, how do you create realistic outdoor architecture that's not too random, and not too complex?
Before we go into how, we must go into why. As stated before, game engines don't like random or complex. More complex equals more vertices. Think about it, a cube has only 8 vertices. Take that cube, and try to make a rock out of it. How many vertices does that take? A whole lot more. More vertices being rendered at a time equals worse framerate. It is another of our goals to make a playable level, which means we must pay attention to this.
Levellord discusses the concept of minimalism in his level design article. The problem is, in the Quake engine, which he is discussing, you actually start out with nothing, and have to add walls, floors, and architecture to insert in. So, in Quake, you would create a brush, much like a JK 3do, and insert it into the level.
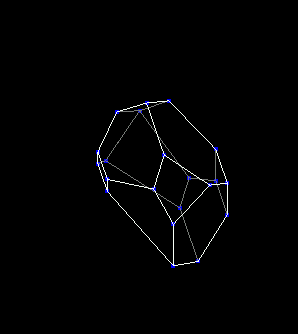
In JK, it is not that easy. When we cleave a mountain or rock out of a sector, we must actually delete the sector that will show up. Why does this matter? Well below is illustrated a rock 3do, simulating a Quake brush, and a rock cleaved from a sector for the JK level. Count the vertices.
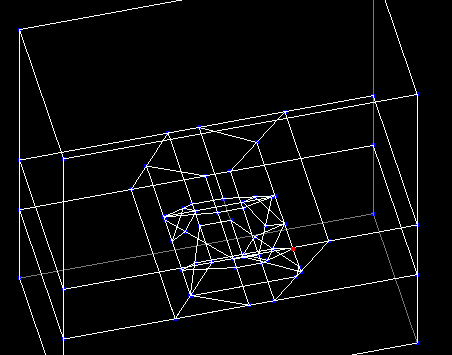
This is the rock sector that would simulate a Quake brush.
This is how you would get the exact same rock in Jedi Knight. Notice that there are tons more vertices. Realistically, you would use a 3do for a small rock like this, but any outdoor architecture takes many more vertices in Jedi Knight than in Quake.
Notice that the JK engine must account for all the vertices along the walls and ceilings of the sector the rock was cleaved out of, as well as those of the rock itself. Therefore, it is even MORE important to take advantage of minimilism in JK editing -- you must do your best to create the architecture with a minimum of vertices.
Now we will actually go into the processes. I want to create a realistic 3d mountain range for the exterior of my level. Sure, I could cleave the ouside surfaces up and flag some of them as "sky," but this way looks a lot better, and is more realistic.
First, it is necesarry to have what I refer to as "boundry sectors." The first one is the HUGE sector that will be the outside boundry of your level. It really isn't that necessary to make it all one sector, but it is fine in this example. Once you have that, decide which side we will create mountains in first. Then, decide how wide the widest hill will be. Cleave the big sector along that boundry, creating a line where your mountains just won't cross.
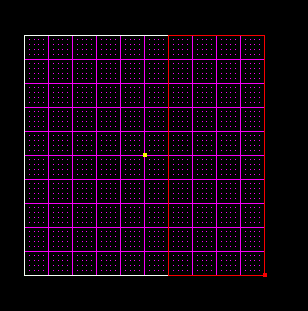
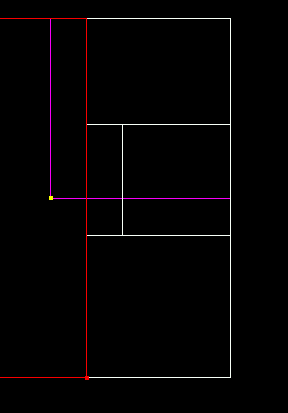
It is important to vary the size and shape of each of your hills. The line was drawn as another boundry, not to be crossed.
Now, take that sector, and cleave it up into a few more, from the top down, to create random boundries for your other hills.
See the illustration below.
Now we must address a different point. Since this is outdoor, the ceilings of all these sectors will be
textured and flagged as sky.
There are a few things to remember when deciding whether some of your mountains are going to extend all the way to
the top of the sector. It is okay to do this if the player has no way of getting up that high. You don't want it to reach all the
way to the top if the player can get up there, as hitting your head on so called "sky" is not very realistic.
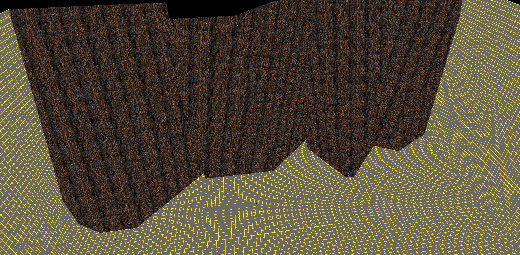
It is time to start cleaving up the mountain sectors to be like real mountains. It isn't important for these to be too complex,
as most likely they are very large. Have you ever stood at the bottom of a mountain range and looked up? You can't see
the actual curves in the mountain, rather, you can see the different types of soil (textures) and the ridges, due to shadows
(that's where good lighting comes in).
The actual process of cleaving the mountains is very easy. Just take what you learned in the outdoor buildings tutorials,
and instead of making the inside sector a cube, cleave it rounded off. This will take more cleaves, but be sure to keep
framerate in mind when making them.
This is a quick example, from a top-down view.
Often it is important to make multiple deletions to get things like overhangs, as if you don't you will end up with non-convex sectors. Once your mountains are all cleaved out, it is time to delete the mountain sectors, making them solid. Once solid, texture them. Remember to do the outside boundries as sky, creating that realistic horizon effect.
It is important to make very random cleaves, making sure none of the mountains look the same. It is also important to remember the field of view (FOV) -- the more of your mountains that are in view at once, the lower the framerate. So, if you have buildings with giant windows, try to limit how much of the range is actually in view at one time -- if it's not in view, the engine is less likely to attempt to render it.
There are other neat things you can do, and I suggest downloading all the outdoor levels you can. Why? Open them up in JED and take a look at how the author went about constructing them. Try to figure out if there were unnecessary or inefficient cleaves. Try to find places where the architecture could have been mimized in order to boost framerate, keeping in mind gameplay.
Its definitely a learning experience, and is impossible to get good at without a lot of practice and failed levels. Remember, practice on non-production levels, and once you're good at the technique, start from scratch and build that production quality level.