i
 |
Dying to get
every possible star in Jedi Knight? Below are hints for the first three
levels. Choose to see other levels from the menu below. Need more hints ?
Here's how to reach our Hint
Department.
Level
1
Double Cross at Nar Shaddaa
(6 secrets)

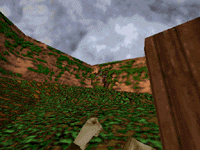
| Just after you pass under
the first of two ceiling fans in this level, you will see this view
off to your right. Jump down to the lower platform and then up onto
the graffitied wall which is slanted upwards. Climb to the top of
this slanted wall and head out onto the roof. Drop down into the
opening you find there. |
 |

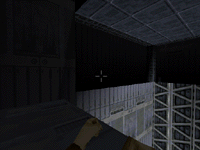
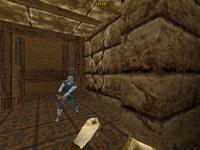
| Just after you pass under
the second of the two ceiling fans in this level, you will pass
through a door. Take one step outside of this door and look down
over the left side of the catwalk. This is the view you see when
looking down (afraid of heights?) Drop to this platform far below
and be prepared to take about 30 points of damage. |
 |
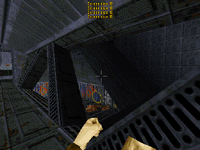
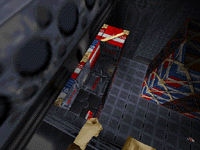
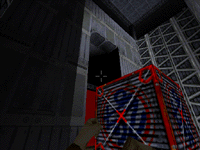
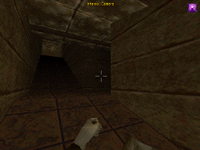
| When you come to the cargo
lift that moves diagonally up and down the shaft, take it up. Just
before the next stop, you will see this dark opening (marked by the
cross hairs) on the right side of the shaft. Move into this opening
as the lift continues up. |
 |
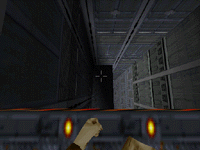
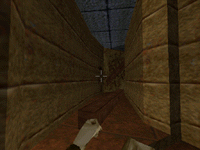
| This next area comes up
after riding the large platform straight up in the first bay with
the opening floor. Open the door and follow the hallway to a
catwalk. Walk across the catwalk and turn to your left. You will see
this narrow, dark-grey, slanted ledge with gaps in it. Jump onto the
ledge and walk along it to the end. |
 |
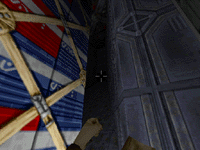
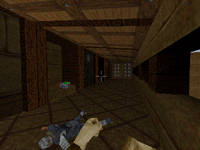
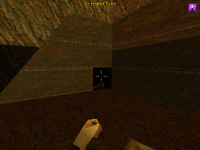
| After you activate the
moving floor in this second bay, you will see a ramp that goes down.
Stand on the top, left side of the ramp and look down into the room
below. You will see this stack of crates below you. Jump down on top
of the colored crates and walk towards the wall where you can drop
down into an opening among the crates. |
 |
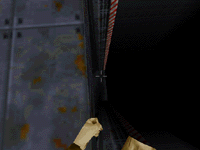
| In this same room, once
you drop from the crates to the floor, find the door, but do not
open it. Instead go behind the stack of crates that are on your
right and look up to see this view. The cross-hairs are marking a
dark opening at the top of this slanted wall. Climb on up and claim
your final secret for level one! |
 |

Level
2
The Lost Disk
(8 secrets)

| After you drop out of the
2nd long pipe, you will be in a long, narrow hallway with
tall windows on the right side. The first window is outlined in
white and red stripes. Look down from the edge of this window, this
is what you will see below. (Are we experiencing vertigo yet? Don’t
worry; It gets worse.) Make the long drop to the platform
below. |
 |
| After you use the red key
and move the narrow beams across the conveyor belt room, cross the
beams and continue until you reach a room with a ramp, a white
canister and two crates. Jump on top of the blue and red crate and
look in the corner that is in the opposite direction from the ramp.
Jump to the dark ledge pictured here. |
 |
| When you enter the room
with the orange and black striped forks, go to the corner with the
blue and red crates. Look over the edge to the identical landing
below you; check out the scenic view! (We told you it would be
worse.) As you can see from the screen shot, this looks impossible.
Just be sure to make a quick save before attempting this drop. Once
you make it (yay!) run over to the fork and walk along it to the
secret area. |
|
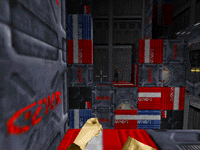
| When you enter the
crate-filled room, jump on top of the crates on the left side of the
room. Now turn and face the opposite stacks of crates. Jump across
to the location shown here and snoop around behind those
stacks. |
 |
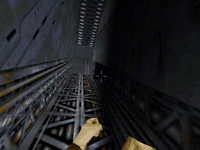
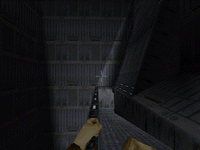
| There are two lifts and
three secrets in this shaft. Ride the first lift up and walk onto
this narrow beam just beneath the conveyor belt on the left side.
Walk along the narrow beam to get to the dark chamber beneath the
conveyor belt. |
 |
| Now jump from the second
lift onto a crate as it passes into the magnetic field. Jump from
the crate to the area above the magnetic field as the crate
disappears. |
 |
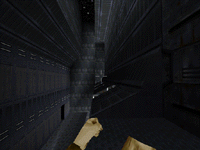
| Ride the second lift up
and walk onto this darkened, narrow ledge just before you reach the
top of the shaft. |
 |
| Finally, as soon as you
come outside, walk up the ramp and turn around. Walk along the
narrow ledge on your left and jump from this spot under the cross
hairs to the secret area. |
 |
Level
3
The Return Home to Sulon
(8 secrets)
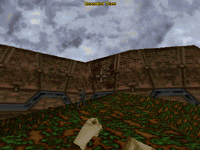
| You begin this level
outside. Look at the sections of surrounding wall for this panel. It
has a crack and appears darker than the rest. Just shoot the wall to
reveal the secret area. |
 |
| Continue examining the
walls but this time look at the vine-covered ones. Look for this
panel with a dark crack in it and shoot it out as well. |
 |
| Once inside the house, you
will come to this hallway, the right side of which has this dark
crack in it. Just shoot it out. This hallway is just before the
first staircase. |
 |
| From the garden room, walk
down the hallway to this blockade. Throw a thermal detonator down to
the end. |
 |
| Upstairs in the house, you
will come to this long hallway with windows to the outside on your
right and two, square alcoves on your left, each with a shield unit
set in them. Shoot the second alcove and a secret panel will
open. |
 |
| Once you come to the lake,
enter the opening to the right of the waterfall. Turn on your field
light. As you go up the ramp, look for this opening on the
right. |
 |
| Once you emerge above the
pools of battery acid. Drop straight down into it and submerge,
turning to look at the direction you jumped from. Swim into this
dark opening. |
 |

| Once you get out of the
battery acid and are walking through the dark hallway with the
flying Mailocs, turn on your field light and look for this opening
on your right. |
 | |