
Rbots Tutorial - Part Three
Improving performance
Last updated 18th July 2001
Author - Raynar
Welcome to part three of the Rbots tutorial. This tutorial will cover how to improve the bots' performance through better node placement, using the 'special' path nodes, and enabling the bots to use and react to custom level cogs. Make sure you have read through and understand part one before attempting the techniques described here. These tutorials cover both the Jedi Knight & Mysteries of the Sith versions of Rbots. As Rbots itself is still under alpha development, it is constantly evolving. This tutorial will also evolve to accomodate any changes.
In order to use this tutorial, you must have some basic editing experience. There are other tutorials available to help you understand the basics. The cog section requires some cog knowledge but you don't need to be an expert.
So you've added Rbots to your level but you find that they don't perform very well. It could be that they fall off ledges, run past turnoffs, don't activate switches or use elevators, get stuck in corners, won't jump over ravines etc. It looks like your level needs some tweaking!
The number one problem when adding Rbots to a level is where to place the path nodes for maximum effect. The nodes themselves perform many functions and may need to be moved if any of the functions don't work as expected.
For example, if the next node is out of the line of sight and happens to be just around a corner, the bot will move straight to where the next node is, regardless of the wall in front of it. The bot can't move through the wall, of course, so will appear to 'get stuck', until it works it out.
| Corner viewed from above | Corner viewed from above |
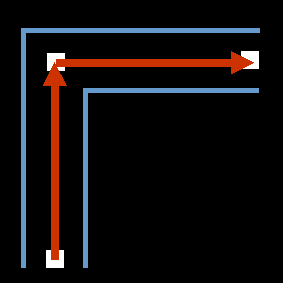 | 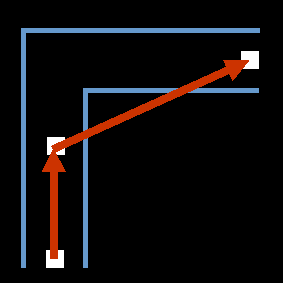 |
| Correct node placement | Incorrect node placement |
| T intersection viewed from above | T intersection viewed from above |
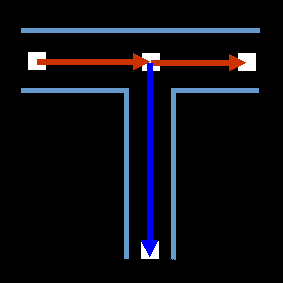 | 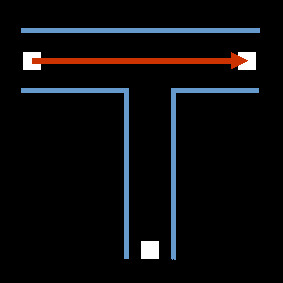 |
| Correct node placement | Incorrect node placement |
| Corner viewed from above |
 |
 |  |
Sometimes there are things that you would like the bot to do at certain locations, such as call an elevator, activate a trap, or even lay a sequencer mine. Other times there are things the bot must do in order to move along the path correctly, such as slowing down to move around a corner on a catwalk so as not to fall off or jump to make it across a ravine etc. This is where the new 'Special path node' system comes into play.
First off, within JED, open up the 'Placed Cogs' window, click on 'Add Cog'. In the 'Resource Picker', select 'rbot-special.cog' from the 'cog\' directory. If the file is missing, the SDK is not properly installed.
Once placed, there are some details we need to setup.
 |
|
You can use any path node that is currently defined in a path as a 'special' path node. The one ghost object is used for both purposes. Just enter the ones you want in as 'sp0', 'sp1' etc. Once you've chosen which ones you want, you now need to enter the info tell the bots what to do when they reach the special path node. Here's the list of what the bot can currently do with special path nodes.
Special path node properties
| 0x01 | 1 | full stop | Bot will come to a complete stop for a few seconds |
| 0x02 | 2 | slow | Bot will slow down to walking pace for a few seconds |
| 0x04 | 4 | jump forward | Bot will jump if it's running forward along the path |
| 0x08 | 8 | jump backward | Bot will jump if it's running backward along the path |
| 0x10 | 16 | lay mine | Bot will use this location for laying sequencer mines |
| 0x20 | 32 | activate forward | Bot will send an 'activated' message if it's running forward along the path (see custum cog section) |
| 0x40 | 64 | activate backward | Bot will send an 'activated' message if it's running backwards along the path (see custum cog section) |
| 0x80 | 128 | wait for arrive | Not yet available |
| 0x100 | 256 | on elevator | Not yet available |
| 0x200 | 512 | run fast | Bot will increase running speed for a few seconds |
The property values are listed in hex, but I've also listed them in decimal to make things easier. If you want to use hex, you'll need a hex <-> decimal calculator. Luckily Windows comes with a handy calculator do do this for you. You can access it from Start Menu -> Programs -> Accessories -> Calculator. Now under the 'View' menu, select 'Scientific'. Your hex <-> decimal calculator is now available for you to use.
All you need to do now is work out which of the above properties you want. It's perfectly acceptable for the one special path node to perform several of these properties. All you need to do is add up the hex or decimal values of each property you want to use and use the sum as the info for that node. The value has to be in decimal, so if you calculate it in hex, you will need to convert it back to decimal anyway.
eg: Node 14 needs to run fast (0x200 hex or 512 decimal), and jump (0x4 hex or 4 decimal). Add up 0x200 + 0x4 = 0x204, or in decimal add up 512 + 4 = 516. You now need to enter 86 as the value for sp[0..19], and 516 as the value for the matching spinf[0..19].
If the node only uses the one property, you don't need to do any calculations at all and just enter the value in decimal from the table above.
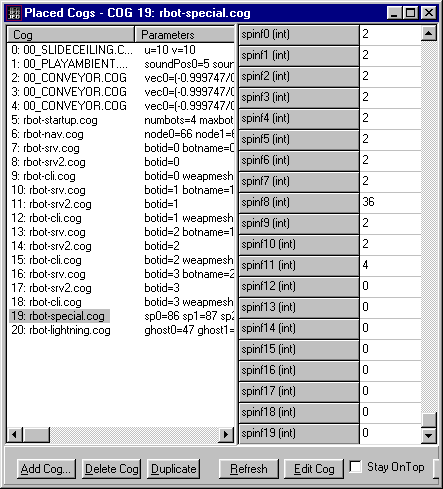 |
In our example screen from above:
|
As you can see there is quite a variety of properties you can get the bot to do. If you come across a situation where none of the above properties will do what you need, feel free to request additional properties.
Please note that it is no longer necessary to use the special path nodes to get the bots to open doors. The bots will now open them automatically as soon as they touch them.
Nearly every multiplayer level these days comes with a least one cog to make the level interesting to play, whether it's a trap that can be activated, a force field, an elevator or simply to open doors. This is fine until you try to convert the level to support bots, which you then will quickly discover that most cogs do not affect the bots at all. The bots won't activate the trap, or receive damage when they touch the force field. The elevator won't move when the bots step on them, and the doors stubbornly refuse to operate when the bots use them. All it takes is a little cog experience and you can fix these problems.
The most important thing to realise is that these cogs were written for players to use, not actors which the bots are. By default, all messages are only generated by players, so we need to modify the cogs slightly to accomodate this difference.
In most cases all that is necessary is to add mask=0x404 to any things or surfaces that would normally generate a 'touched' message. This new value allows both players and actors to generate messages from that thing or surface. Adding this to a forcefield cog for example will now allow the bot to be damaged when it touches it. You can also add this mask value for sectors that have an 'entered' message generated.
Quite a few cogs need something activated in order for them to work, for example the lightning trap in Canyon Oasis. All you need to do is add is a 'trigger' message to the symbols section, and add the trigger section.
trigger:
  if (getsourceref() == 11030)
  {
    if (VectorDist(GetThingPos(GetParam(1)), SurfaceCenter(switch0)) < 0.3) call activate; // bot is close enough to activate
  }
  return;
This is where the special path node system integrates with the custom cogs. If you define a special path node as 'activate', when the bot gets close to it, it will send a 'trigger 11030' message to all cogs. The custom cog picks up this trigger message, checks to see if it's close to the surface it's supposed to activate and then simply calls the activate section of the cog as if the player activated it.
You will of course find that many cogs will need to be significantly altered before they can used by the bots. You may need to change the way the cog works, or opt for a different solution altogether.If you have any difficulty at all modifying cogs for the bots to use, feel free to drop me a line asking for assistance.
If you have any standard door cogs in your level, you can use the ready-made 'rbot-door.cog' which is already included in the SDK. This is for a single door only.