One Rebel's Sacrifice: Levels 1-3
Mission Type:
Author:
Post Date:
Download:
March 11, 1999
http://files.tacc.massassi.net (1229 KB)
Level Review
Basics
Reviewer:
Overall Score:
Date Reviewed:
Design:
Dynamics:
Experience:
79 / 100
87 / 100
70 / 100
First Impressions
Well, the plot certainly intrigued me; however, once I actually played it I realized that the levels don't really follow the premise of protecting Leia. Instead it's more of a "Adventures of Carni Yoole" type of thing. It is possible to argue this fact though since it did make the levels interesting and surprising.
Design / Visuals
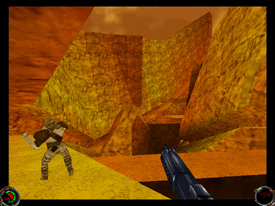
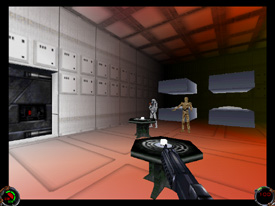
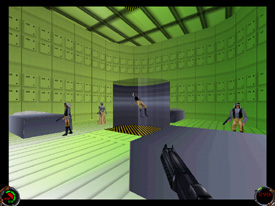
Architecture had it's moments of glory and disaster. The second level "Beggar's Canyon" was well done architecturally. Complete with a new MAT for the sand, it really made the level feel like a canyon. The first level tended to be a bit boxy at the start with right angles and cubed rooms. Fortunately, the author opened it up a bit with an incredible cargo room. Also, the level setting is in a Correlian Corvette so some of the said cubed rooms can be condoned. Where the architecture really failed was in Mos Eisley. The author had a perfect opportunity to make some amazing scenes, but instead he stayed with boxy rooms and right-angled corridors. While this can be excused in a starship, I see no reason why the author couldn't have at least mixed up the geometric shapes. Fortunately, the author started to get creative towards the end and made a market place that was pleasing to the eye. I also liked the hangar bay as well. Colored lighting was, for the most part, done incredibly. However, there were parts where too much was used and in other parts, not enough. Beggar's Canyon had almost no colored lighting (as it should have been) and Mos Eisley had some scenes where the colored lighting gave the level that, oh so sweet, final touch. However some parts in the Corvette were really horrendous. Since when is the lighting inside an air duct an intense yellow? Also, towards the end of the first level there is a giant circular room that's about 40 feet high, and the walls, floors, and ceiling are white. That's it. No shading or anything. Now that's what I call an eyesore.
Dynamics / Interactivity
You will find three new enemies in "One Rebel's Sacrifice", and all three of them really add to the gaming experience. There are throw troopers that hurl Thermal Detonators at you with unexpected accuracy, Sand People which are easy to kill but are great in numbers, and Speeder Tuskens which pop out at inconvenient times. Personally, I think that the TD troopers are by far the hardest and most challenging (beware the blue patched soldiers). Items were surprisingly well placed. The first level only had a few power-ups, but one of them was a revive that was placed mid-way through the level. The second level had one super shield, but it too was well placed if somewhat hidden. The third level didn't offer any power-ups until the very end in the market place. This made each level very challenging. Ammo, was mainly limited to what enemies dropped, adding to the challenge. COG's were standard, but there are some incredible cut-scenes and new 3DO's which more then make up for the basic COG's.
Playing Experience / Atmosphere
Detail was used when it was needed and left out when it wasn't. The market place at the end of the Level 3 was very detailed and had some small touches (archways, and colored lighting) that really helped accent the mood. Level 2 (like it was supposed to be) is not as detailed as level 3 since it's just a canyon and nothing else. The author was smart enough, however, to include rock formations and ledges which kept the level from becoming boring. Mood was remarkably tense during the game. After level 1, your objectives occur as you progress forward, which gave a sense of improvisation and added to the realism. The fight with the probe and assassin droids in the cargo room of level 1 was very intense for me (and fun). Also, the lack of power-ups kept me in stealth mode for much of the game. This, of course, just added to the atmosphere that the author created. The series, unfortunately, raises a couple questions. It doesn't have anything to do with the plot or the timeline, or the way the levels were set up (Mos Eisley was set up well and Beggers canyon looked and felt like a canyon). However, there were a couple questions that were in my mind when I was finished playing. In the Star Wars technical Journal I read that Correlian Corvettes don't hold fighters. Why then were there two X-wings and a T-wing sitting in what appeared to be a hangar (because if there weren't any fighters then Carni wouldn't be able to get off the ship:). The fuel in level 1 doesn't eat away at your health like the fuel in level 9 of JK did. Also, at the end Carni escapes from Mos Eisley. However, I don't think that the game should have ended there. According to the timeline, all the events that happened span over a period of only a few hours. If this is true then there's still a Star Destroyer hanging around in orbit. All in all I thought the ending was too abrupt (dare we hope for an episode IV?). The author is right about one thing. You need a 3D card to play the game. Playing this without one is really boring, especially level 1 where almost all the walls are white. Although, I didn't come across any beta testers while reading the text file, (usually a big mistake) the author kept the game bug free. It is possible to get stuck in the game, but it's pretty tough to do. You would almost have to be trying in order for it to happen. Other then two or three places where the textures weren't stitched properly, the series came off as a solid one. The framerate and lag trouble should be nil since everyone playing this should have a 3D accelerated card.

Final Thoughts
Despite a few architectural problems, the series came off strong. With cutscenes, new enemies, and an unfolding story-line this three level set should suit anyone who meets the requirements. Download it at your convenience.
Design:
Dynamics:
Experience:
79 / 100
87 / 100
70 / 100
Overall:
85